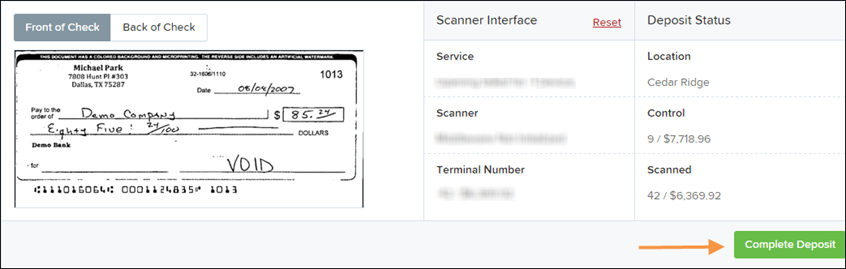
The Data Entry View Page
After checks have been scanned, you can select the Data Entry View page to enter or review additional information about the checks in the deposit.
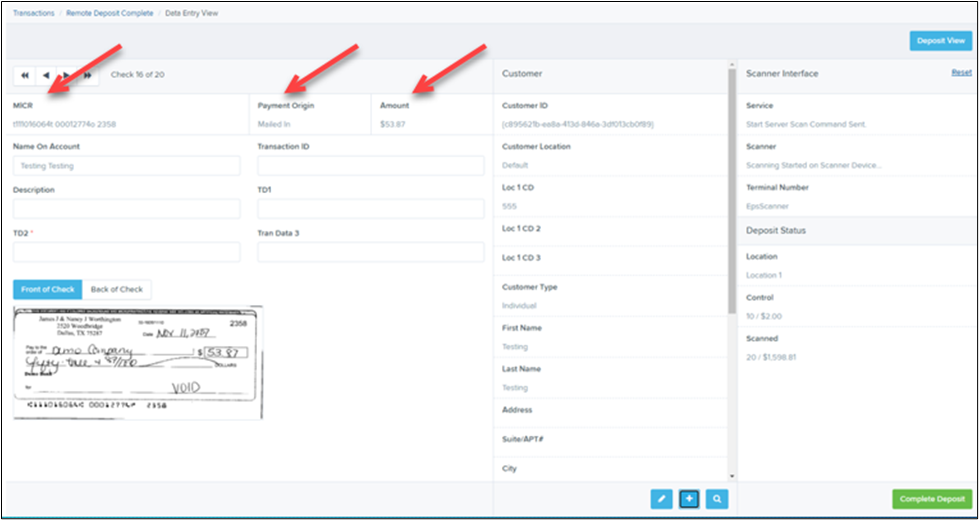
When a check is scanned, some information will automatically fill in, including:
MICR information (numbers at the bottom of the check)
Payment Origin
Amount
Customer Location Notice
If you hover over the Customer Location field, a message will appear explaining how this setting affects automated check matching.
Assigning a Customer Location will limit automated matching for that customer to deposits made at the selected location only.
Because of this, you should only assign a Customer Location if you specifically want to restrict automated matching to that deposit location.
NOTE: Use the Customer Location option carefully, as it can affect how future deposits are matched.
Fields Available on the Data Entry View Page
The fields shown on the Data Entry View page may vary depending on your Remote Deposit Complete settings. Below are the most common fields and what they are used for.
NOTE: Your financial institution may allow up to three additional custom fields to be added for customer or transaction information. These fields can be optional or required. Contact your financial institution if you would like additional fields added.
Field | Description |
|---|---|
Account Number | Required field that lists the account number associated with the transaction. |
Address | Customer’s mailing address. This information will automatically appear again when checks from the same customer are scanned in the future. |
Amount | The dollar amount of the check written in two-decimal format (for example, XX.XX). |
Check Number | The check serial number. This is a required field and appears on transaction details and reports. |
City | The customer’s city of residence. This will automatically populate the next time a check from the same customer is scanned. |
Company Name | Used when the customer type is set to Business instead of Individual. |
Country | The country where the customer resides. |
Customer ID | A unique identifier assigned to each customer. This can be used to search for customer information in the future. |
Customer Location | Indicates the location associated with the customer’s account. Use carefully, as it can limit automated matching for deposits. |
Customer Type | Indicates whether the customer is an Individual or a Business. The default setting is Individual. |
Daytime Phone | Customer’s daytime phone number. |
Deposit Name | A system-generated name for the deposit that includes the date, time, and deposit ID. This name can be edited if desired. |
Description | Informational field used to add notes about the transaction. |
Driver’s License | Customer’s driver’s license number. |
Email Address | Customer’s email address. |
Evening Phone | Customer’s evening phone number. |
Fax Number | Customer’s fax number. |
Federal Tax ID No. | Used instead of Social Security Number when the customer type is set to Business. |
First Name | Customer’s first name. |
Last Name | Customer’s last name. |
Name on Account | The name associated with the check or bank account. This field appears on reports. |
Number of Checks | Displays the number of checks included in the deposit. |
Payment Origin | Shows how the payment was received. Possible values include: Mailed-In, Drop Box, Retail/Point of Purchase Sale, or Back Office. |
Routing Number | The bank routing number associated with the check. This field is required and validated by the system. |
Social Security Number | Customer’s Social Security Number (for individual customers). |
State | The state where the customer’s driver’s license was issued. |
Suite/Apt. # | The customer’s apartment or suite number. |
Total Amount | Displays the total amount of all checks in the deposit. |
Transaction ID | A unique identifier for each transaction. If left blank, the system will automatically generate one. |
Zip/Postal Code | The customer’s zip code or postal code. |
Many of these fields will automatically populate the next time a check from the same customer is scanned.
Managing Customer Information
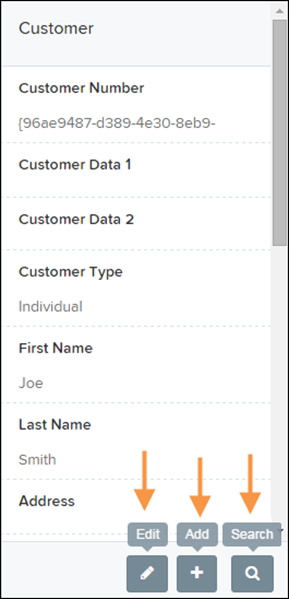
If you need to manage customer information, use the options in the Customer panel.
You can:
Edit an existing customer’s information
Add a new customer
Search for an existing customer to associate with the check
Phone number fields also include data validation to help ensure the information entered is formatted correctly.
NOTE: Information entered on either the Data Entry View page or the Deposit View page will automatically save when switching between the two tabs.
If you frequently process checks from the same customers, the system will store customer information and automatically populate it when those customers’ checks are scanned again.
Fields Used to Create Customer Records
The following fields can be used to create or match a customer record:
Name on Account
Customer Number
First Name
Last Name
Address
Daytime Phone
Evening Phone
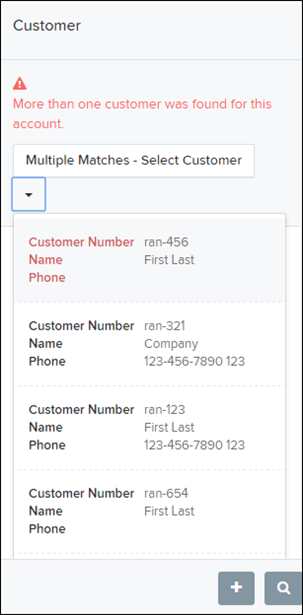
If more than one customer record matches the check information, the system will display Multiple under the Customer Number column.
Double-click Multiple to open the Data Entry View page and select the correct customer.

Submitting the Deposit
When you are ready to submit the deposit, you can select Complete Deposit from either the Deposit View tab or the Data Entry View tab.
After selecting Complete Deposit, the system will return you to the Open Deposits page.